How to use Facade Design Pattern
The Facade Design Pattern is a structural design pattern that provides a simplified interface to a complex subsystem. It hides the complexities of the underlying system by providing a single unified interface, making it easier to interact with the system as a whole.
1. Key Points
- Simplification: The main goal is to simplify the interactions between the client and the system by exposing only what’s necessary.
- Decoupling: By introducing a facade, the pattern decouples the client from the subsystems, reducing dependencies and making the system easier to manage or extend.
- Implementation: A facade class sits between the client and the subsystems. It defines a higher-level interface, and clients interact with this facade rather than the individual components of the subsystem.
2. When to Use
This pattern is often used in conjunction with other design patterns and helps promote loose coupling in the architecture.
- When you want to provide a simple interface to a complex system.
- To decouple subsystems from clients and other subsystems.
- When you want to layer your system, using the facade to interact with lower-level components.
3. How to implement
3.1 Scenario
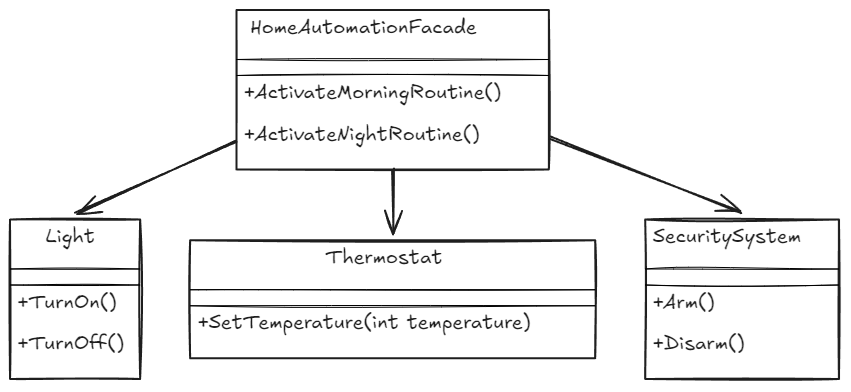
In a home automation system, there may be various complex subsystems (lights, heating, security, etc.). A facade could be a HomeAutomationFacade class with a method like ActivateMorningRoutine() and ActivateNightRoutine(), which turns on the lights, adjusts the thermostat, and disarms the security system, encapsulating the complexity of each subsystem.

3.2 Implementation
First, let’s create the subsystem classes that handle individual functionalities: Light, Thermostat, and SecuritySystem.
Step 1: Subsystem Classes
// Light Subsystem
public class Light
{
    public void TurnOn()
    {
        Console.WriteLine("Lights are turned on.");
    }

    public void TurnOff()
    {
        Console.WriteLine("Lights are turned off.");
    }
}

// Thermostat Subsystem
public class Thermostat
{
    public void SetTemperature(int temperature)
    {
        Console.WriteLine($"Thermostat set to {temperature} degrees.");
    }
}

// Security System Subsystem
public class SecuritySystem
{
    public void Arm()
    {
        Console.WriteLine("Security system armed.");
    }

    public void Disarm()
    {
        Console.WriteLine("Security system disarmed.");
    }
}
Step 2: Facade Class
Now, we create the HomeAutomationFacade class that provides a simplified interface to the client.
// Facade Class
public class HomeAutomationFacade
{
    private Light _light;
    private Thermostat _thermostat;
    private SecuritySystem _securitySystem;

    public HomeAutomationFacade()
    {
        _light = new Light();
        _thermostat = new Thermostat();
        _securitySystem = new SecuritySystem();
    }

    public void ActivateMorningRoutine()
    {
        Console.WriteLine("Activating Morning Routine...");
        _light.TurnOn();
        _thermostat.SetTemperature(22); // Set to a comfortable morning temperature
        _securitySystem.Disarm();
    }

    public void ActivateNightRoutine()
    {
        Console.WriteLine("Activating Night Routine...");
        _light.TurnOff();
        _thermostat.SetTemperature(18); // Set to a cooler night temperature
        _securitySystem.Arm();
    }
}
Step 3: Client Code
Finally, the client uses the HomeAutomationFacade to interact with the subsystems in a simplified manner.
class Program
{
    static void Main(string[] args)
    {
        HomeAutomationFacade homeAutomation = new HomeAutomationFacade();

        // Client interacts with the facade to activate routines
        homeAutomation.ActivateMorningRoutine();
        Console.WriteLine();
        homeAutomation.ActivateNightRoutine();
    }
}
Explanation
- Subsystem Classes: Light, Thermostat, and SecuritySystem each have specific operations.
- Facade Class: HomeAutomationFacade provides a simple interface (ActivateMorningRoutine and ActivateNightRoutine) that internally manages the interaction with the subsystems.
- Client Code: The client interacts only with the facade, simplifying the control of the complex system.


